How Can We Help?
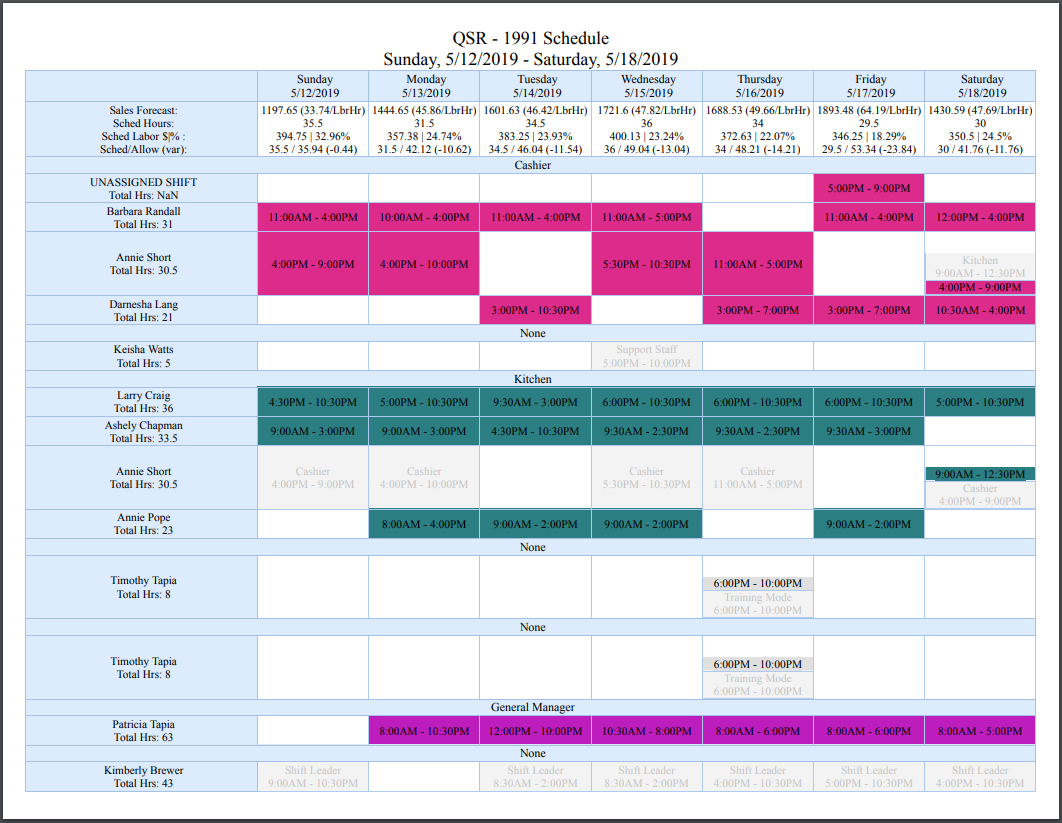
Schedule Options
Schedule options are located in the Gear icon at the bottom right of the screen. These options can be accessed by hovering over or clicking the Gear icon. Depending on your role privileges, some of these features may be restricted by your company administrator. If any options listed in this article do not appear in the schedule options list, please contact your company administrator for questions or assistance.
The Gear Icon in the bottom right of the screen Accesses the Schedule Options
![]()
The Schedule Options
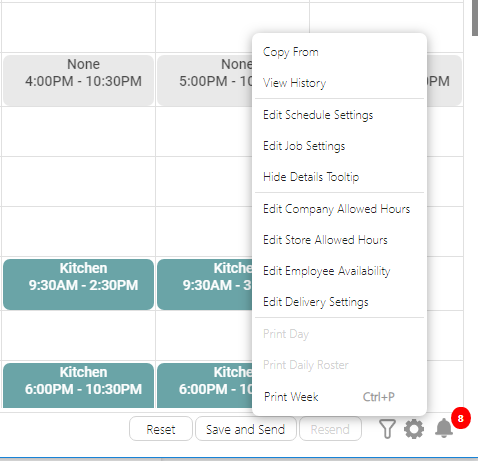
Copy From
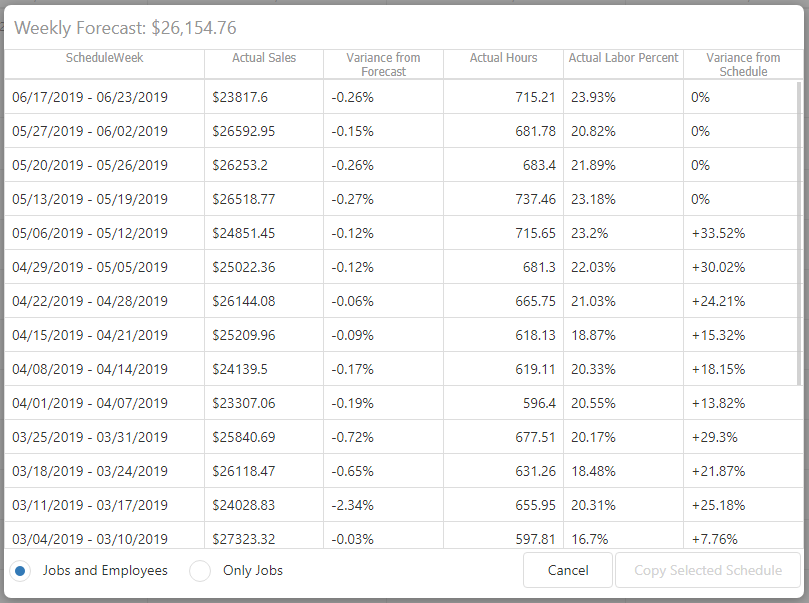
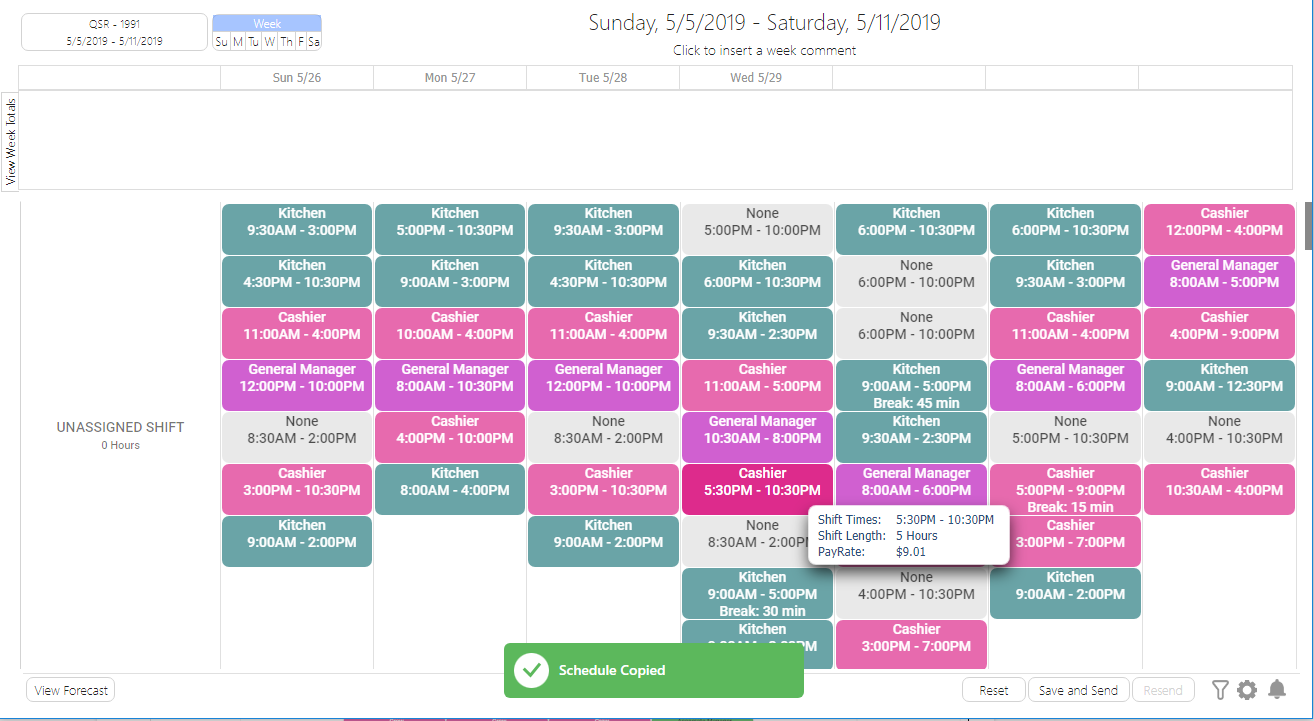
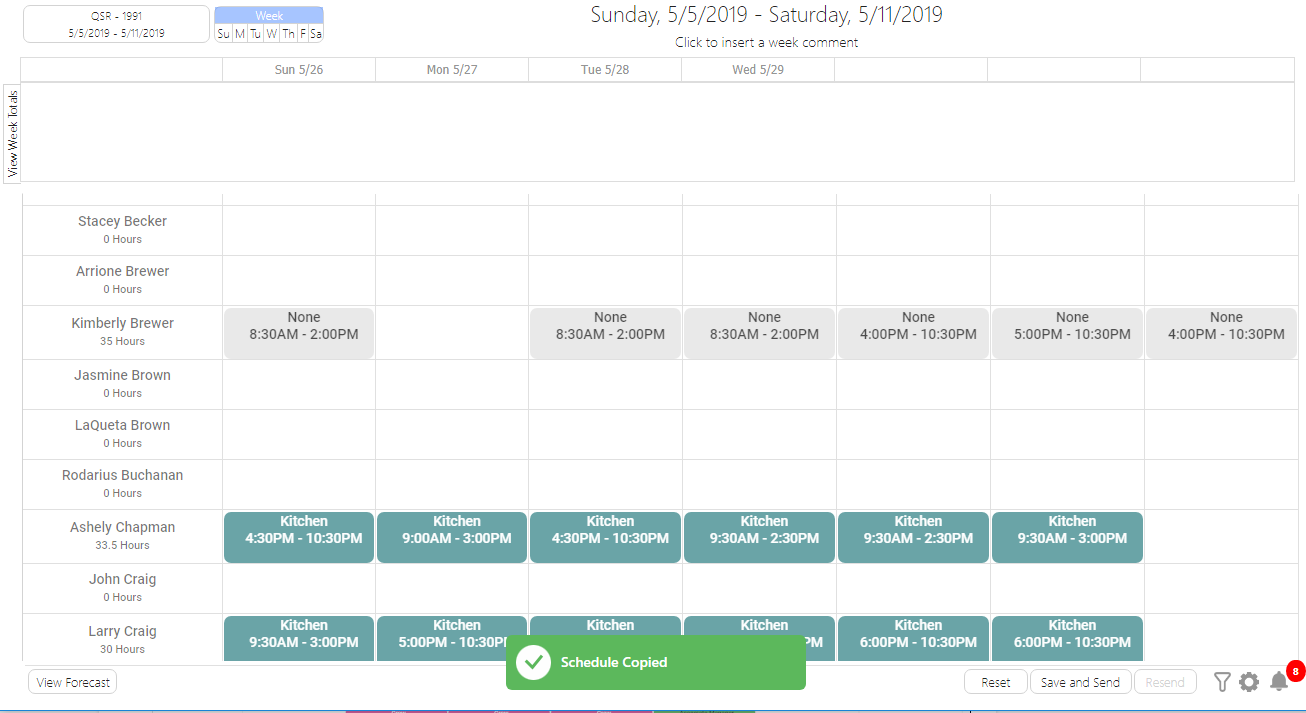
The first schedule option in the gear icon is “Copy From”. If previous schedules have been saved, you have the ability to copy a schedule from a previous week. When “Copy From” is selected, previous schedules are displayed with helpful details such as the actual sales for the week, forecast variance, and schedule variance values which can be used to compare to the forecasted sales for the week you are building. Once you select a previous schedule, you can choose to copy “Jobs and Employees”, which are the shifts with the employees assigned as they were in the selected schedule, or to copy just the shifts with job codes with the “Only Jobs” option.
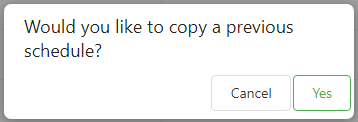
The following prompt will appear to open the copy pop-up when a new schedule is loaded.
Copy Pop-up – Select a Previous Schedule to Copy From, with “Jobs and Employees” Selected
Successful Copy of “Jobs and Employees” from a Previous Week.
Successful Copy of “Only Jobs” from a Previous Week
View History
The audit history for the currently loaded schedule can be accessed from the gear icon by selecting “View History”. Selecting “View History” will take you to the schedule history page, where each saved version is listed with its timestamp, source, user who performed the save and the schedule details/changes included in that version.
The source will tell you if the schedule was saved from the desktop, web, QSROnline Managing App (by approving a request off or shift trade) or QSROnline Scheduling App (by submitting a request off). It will also notate if the schedule was saved manually, or if it was an autosave. In the schedule history page, autosaves are indicated with the source “Web Autosave”.
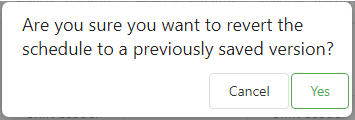
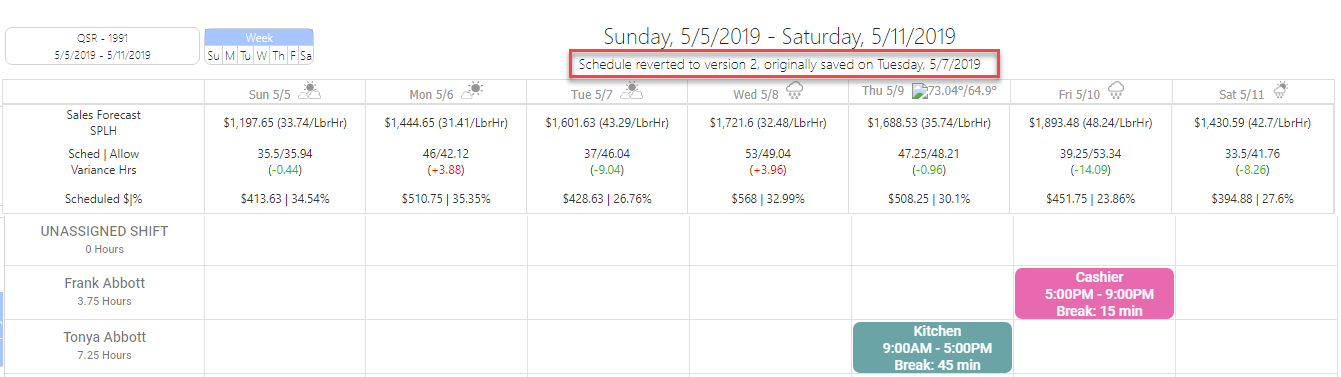
From this page, you will be given the option to revert to a previously saved version of the schedule. After the schedule is reverted, you will be returned to the scheduler page with the details of the selected version pre-loaded and the schedule comment changed to indicate that the schedule was reverted.
View History Window

The Revert to Selected Version Pop-up Confirmation
The Schedule Comment Changed to Reflect the Reverted Status
Edit Schedule Settings
The schedule settings can be edited by selecting “Edit Schedule Settings” from the gear icon. A pop-up window will display with the schedule settings. The following settings can be edited here:
- Default weekly hour limit: this is the default maximum number of hours that you would like employees to be scheduled for during any given week. Any employee scheduled over that number of hours will generate a schedule alert. Weekly hour limits for individual employees can be set in the availability settings page that will override this value for a specific employee.
- Hours before week limit alert: This is the number of hours under the weekly limit that you would like to see schedule alerts for. The purpose of this is to alert you of any employees that are approaching their weekly limit.
- Default daily hour limit: this is the default maximum number of hours that you would like employees to be scheduled for any given day. Any employee scheduled over that number of hours will generate a schedule alert. Daily hour limits for individual employees can be set in the “Availability Settings” page that will override this value for a specific employee.
- Minimum hours between shifts: this allows you to set the minimum number of hours that need to exist between any employee’s shifts. This was designed for closing/opening requirements, where an employee can not have shifts less than a certain number of hours apart.
- Hide Break Times: This setting will allow you to either hide or show the scheduled break start and end times in the text message, email, printed schedule and scheduling app. It is checked by default, meaning that any scheduled breaks will only display the number of break minutes to employees, but if it is unchecked, the start and end times will also be shown.
- Snap to Quarter Hour: By default, the behavior of the scheduler is to push the start and end times of the dragged shift to the nearest quarter hour. This setting allows you to turn off the snap to quarter hour feature.
The schedule settings pop-up

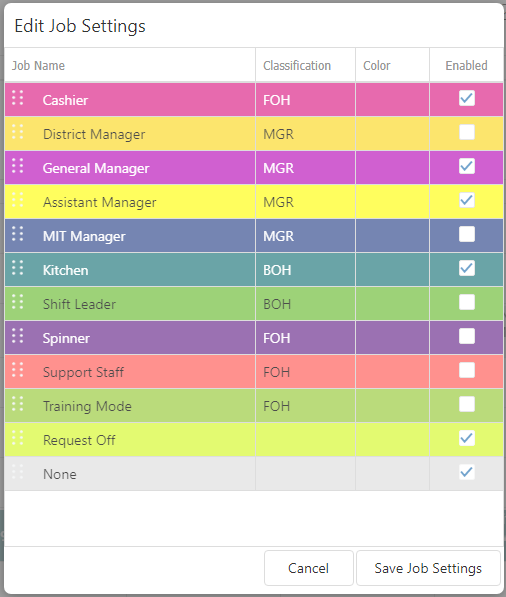
Edit Job Settings
The job settings can be edited by selecting “Edit Job Settings” from the gear icon. This will open the job settings editor to change which job codes are visible, edit the sort order, classification and color of the available job codes.
Please keep in mind that the job codes list is pulled directly from your POS system. See the Things to Know Before Opening the Scheduler guide for greater detail.
Unlike previous versions of the scheduler, these settings are saved at the store level, allowing users to pick setting options for each store instead of applying a company default. Please keep in mind that editing the job settings will impact all other users with access to the store that has been edited.
Removing the check mark from the “enabled” checkbox for a particular job code will hide that job from the scheduler, making any shifts that were assigned to that job be reassigned to the job code “none”.
Edit Job Settings Pop-up
“Sort order” Can be Changed by Dragging and Dropping Rows
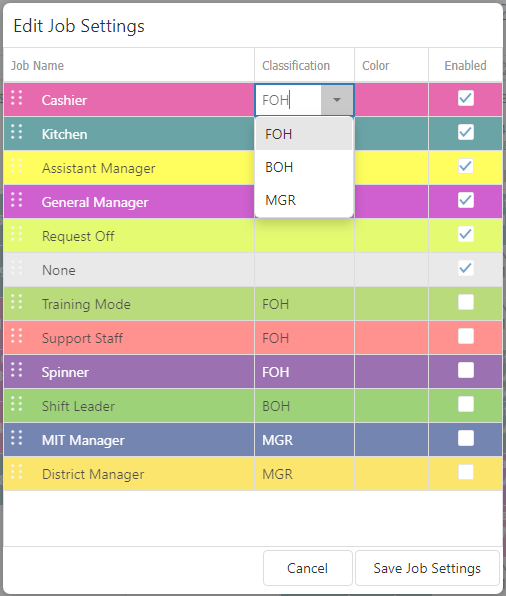
Classifications can be selected from a list of existing classifications for the store, or they can be typed directly into the cell. Classifications are the equivalent of “Departments” for labor scheduling. A common example of popular classifications include: FOH (Front of House), BOH (Back of House) and Bar.
Classifications Can Be Either Selected or Typed
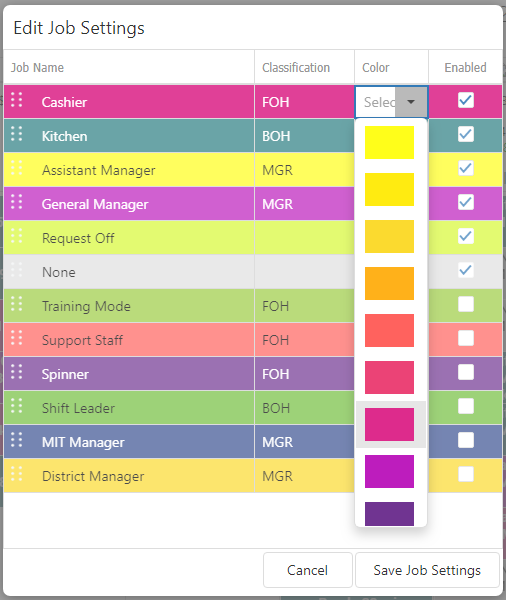
To Change the Color of a row, Click in the Color Cell for the Job Code and Select a New Color from the Dropdown.
Hide Details
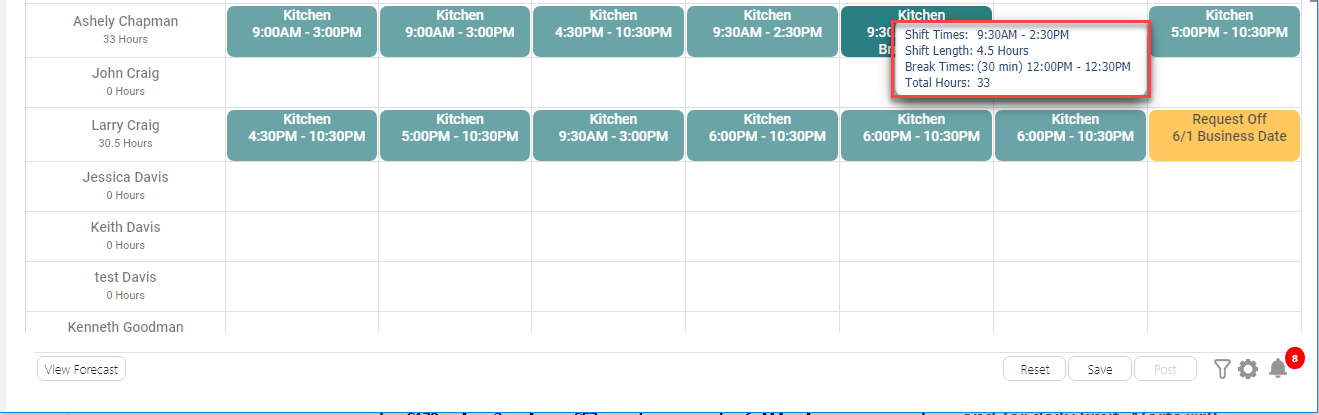
Hovering over any shift will reveal detailed information about that shift, including the shift start and end times, the length of the shift, payrate, the employees’ total scheduled hours for the week, scheduled break times, and any shift comments.
By default this tooltip is always shown when the scheduler is loaded, but it can be disabled through the gear icon by selecting “Hide Details Tooltip”. To turn it back on after it has been disabled, simply return to the gear icon and select “Show Details Tooltip”.
Details Tooltip Shown by Hovering Over Any Shift.
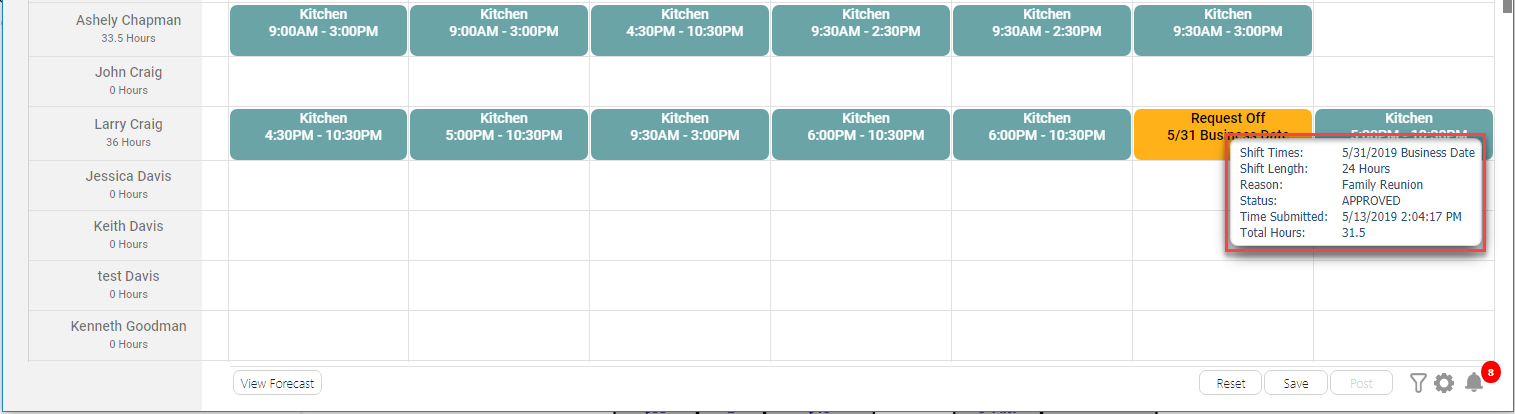
For requests off, the Details Tooltip will also display when the request off was submitted, whether or not it has been approved and the reason supplied by the employee from the QSROnline Scheduling App.
Details Tooltip Shown When Hovering Over a Request Off.
Edit Company/Store Allowed Hours
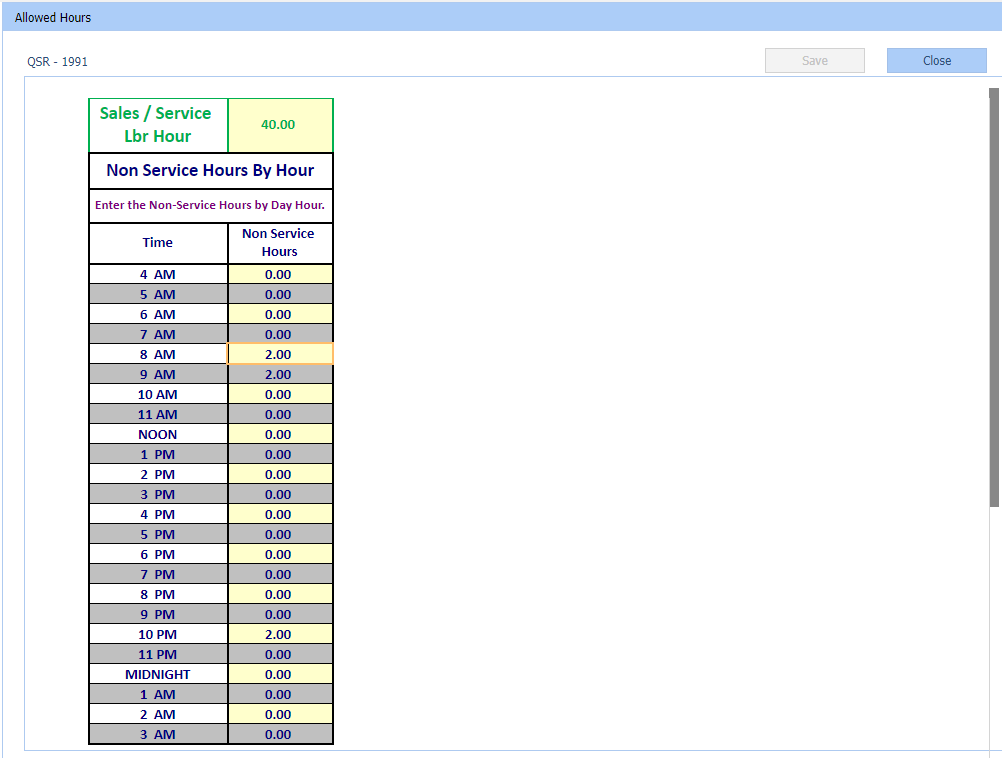
Allowed Hours provides a theoretical labor guideline. This tool provides a suggested number of employees who should be scheduled per hour based on forecasted sales and can be customized at the Company level or at the Store level. Detailed information about Allowed Hours can be reviewed in the Scheduler Allowed Hours Setup guide.
Edit Employee Availability
The Edit Employee Availability feature allows managers to involve employees in the scheduling process. Employees setting their times of availability in the Scheduling App will help prevent any scheduling conflicts. Build schedules that not only work for your business, but also for your employees.
To set the Employee Availability select “Edit Employee Availability” from the gear icon. Select an employee from the drop down and right click the specific day of the week you are needing to edit the availability for. Choose one of the options below from the right click context menu. Click Save once you have edited the availability for the selected employee.
- Custom Availability: Allows managers to edit the Unavailable block to any specific time(s) as needed.
- Available All Day (Default): Employee has no scheduling restrictions and is available all day.
- Unavailable All Day: The employee is not available to work at all for the specific day.
- Available for Daypart: The employee is available to work during specific Dayparts. Dayparts are set during new company onboarding. For more detailed information regarding dayparts, see the Things to Know Before Opening the Scheduler guide.
- Unavailable For Daypart: The employee is unavailable to work during specific Dayparts.

Edit Delivery Settings
Schedules can be emailed, texted, and sent to employees via the QSROnline Scheduling App as a push notification. To access schedule delivery options, click “Edit Delivery Settings” from the gear icon. For more detailed information, see the Sending Schedules to Employees guide.

Printing
There are three formats available for printing the schedule: Print Day, Print Daily Roster and Print Week. Selecting any of these three Print options will generate a PDF for easy download and printing. To access the print options, select the appropriate print option in the gear icon.
Print Day
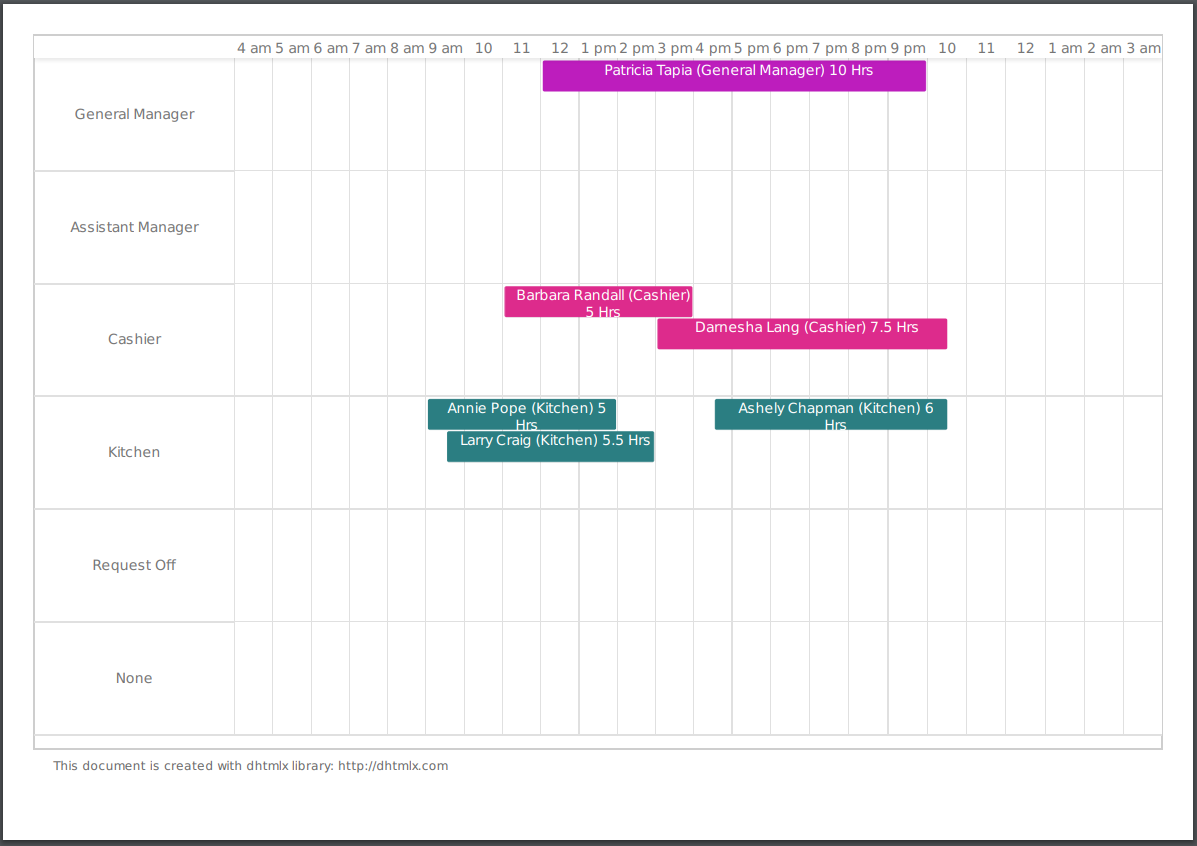
“Print Day” prints the timeline for the selected day. This prints the shifts as they appear on the scheduler’s daily view for the currently loaded day and will reflect whether or not the shifts are grouped by job or are in the compact view.
Print Day with the shifts grouped by job code.
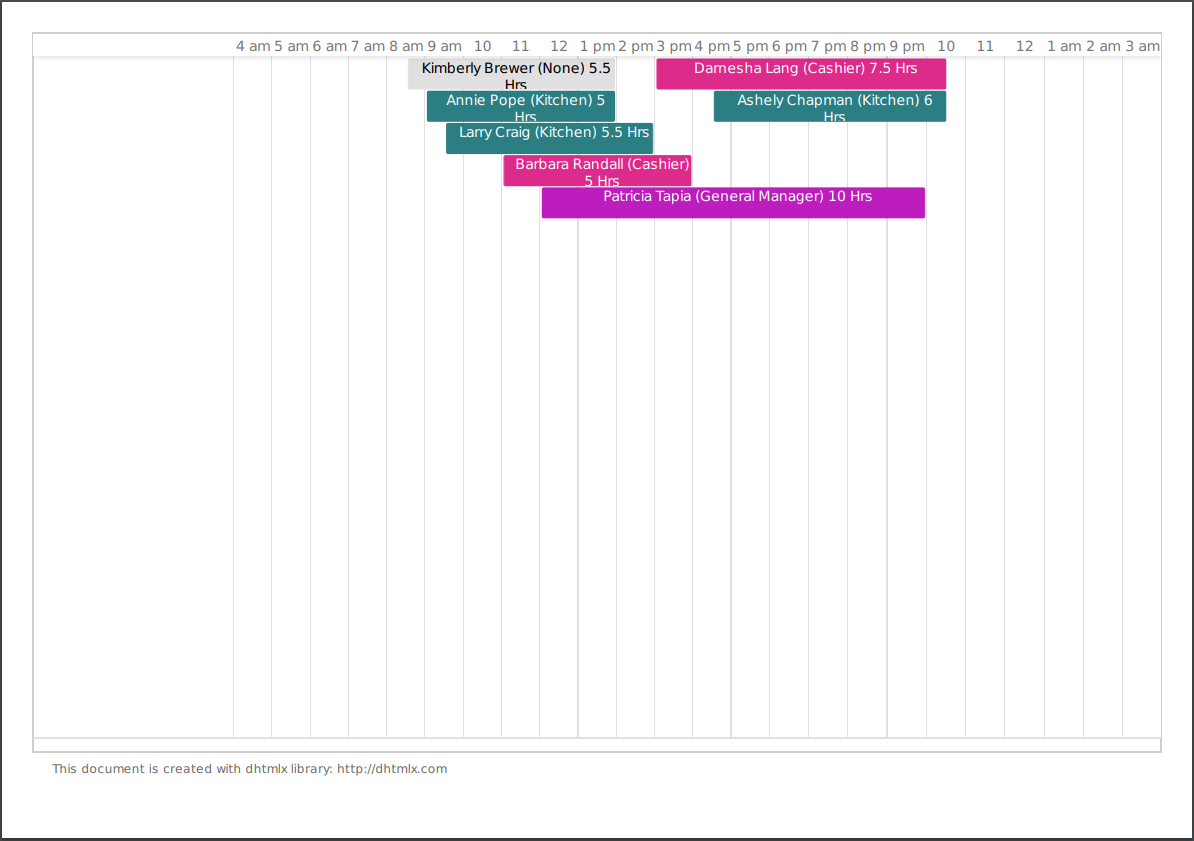
Print Day with the compact view selected.
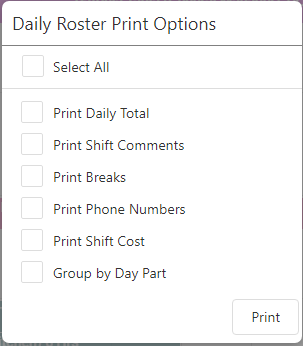
Print Daily Roster
“Print Daily Roster” will open the roster print options, allowing you to select your printing preferences. Selecting print will generate a PDF of the roster with the selected items applied for the day that is currently loaded.
The Daily Roster print options.
The Daily Roster print with option selected.

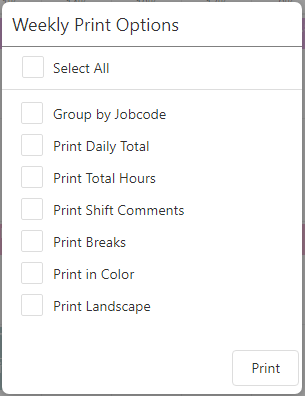
Print Week
The week can be printed from any view by selecting “Print Week” from the gear icon menu, or by using the shortcut key combination Ctrl + P. The week print options will pop-up allowing you to choose your printing preferences. After selecting the desired options and selecting ‘Print’, a PDF document will be generated and downloaded.
The print options pop-up.
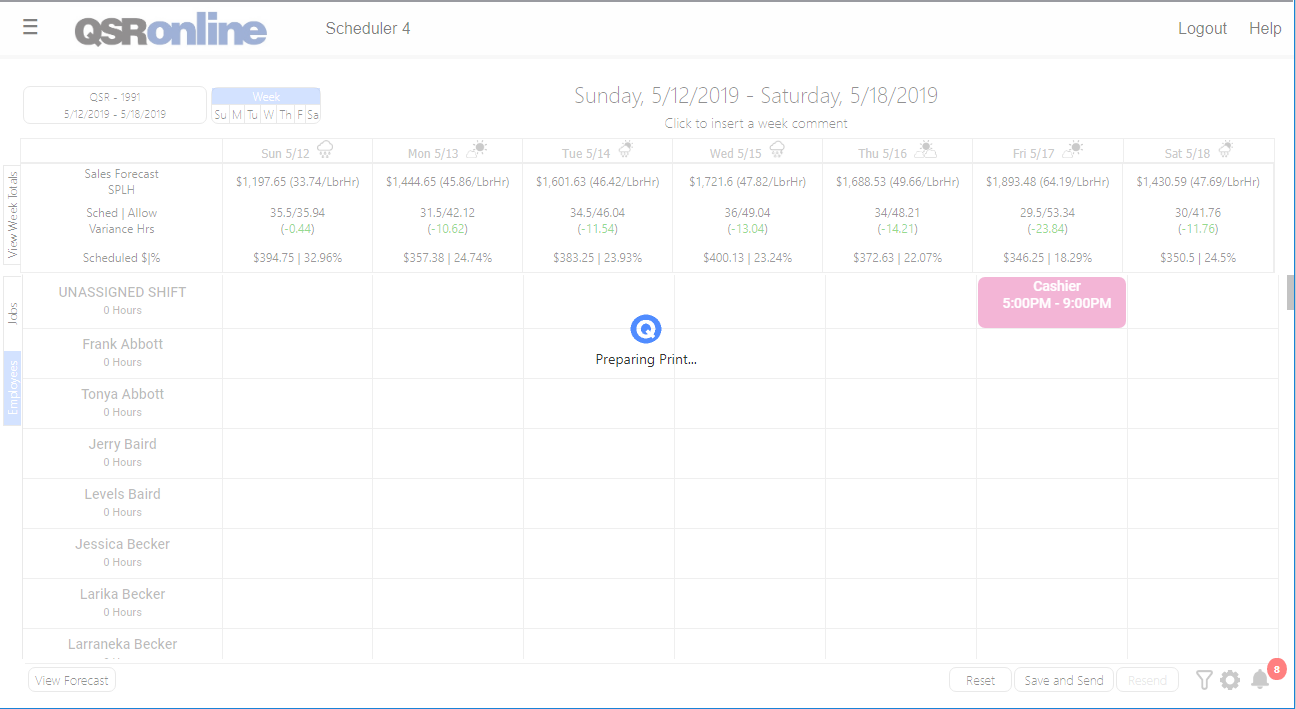
The loading message displayed while the PDF is being generated.
The print PDF generated with all options selected.