
How Can We Help?
The QSROnline Scheduler 3 provides managers with a proactive scheduling process that includes forecasting sales for upcoming weeks and projecting a labor force that meets labor goals. This guide reviews the layout of Scheduler 3 for easy access to it’s many features.
Accessing Scheduler 3
To access your QSROnline account, go to my.qsronline.com. Sign in with your QSROnline username and password.
Click the Scheduler icon in the quick links at the top of the screen or go to Menu, scroll down to Labor and click Scheduler.

Tutorial
When first accessing the QSROnline Scheduler 3 a new user tutorial will begin. Hit the Enter key on your keyboard to navigate through the different sections.

Help
The upper right hand has a Help button. Once clicked you will see the following options:

- Visit QSROnline Guides – This is a quick link to access this website from within my.qsronline.com (sonicsupport.qsronline.com).
- Submit a Ticket – This button takes you to a form to quickly submit a ticket directly to QSROnline Support.
- View Tutorial – View the opening tutorial if needed. Remember to click Enter on your keyboard to advance the tutorial.
Scheduler 3 General Layout
Scheduler 3 has 3 areas. The header (highlighted in green), scheduler editor ( highlighted in red), and footer (highlighted in blue).

Header

The Scheduler 3 has a header that contains the following options.
- Unit Selector – Administrators can use the unit selector to switch between each location’s schedule.
- Week Picker – Choose the schedule work week to view the schedule.
- Select Day – You can click a day in the week grid or by clicking the Select Day button.
- Grid Options – View totals by day, daypart, or hourly.
- The grid also contains
- Sales Forecast – The sales forecasted for the selected day, daypart, or hour.
- Sched Hours – The total scheduled hours for the selected day, daypart, or hour.
- Sched Labor $ / % – The total labor dollars / labor percent for the selected day, day part, or hour.
- Sched/Allow (Var) – The total scheduled hours/allowed hours and the difference for the selected day, daypart, or hour.
- The grid also contains
- Group/Ungroup – By default shifts are grouped in day view by job. You can select to ungroup jobs or select specific jobs to view. You can also click the Job Code button to group by Job Classification, discussed in Job Settings.
Scheduler Editor
For details on how to build a schedule see Creating a Schedule, discussed in the next article.
Schedule by Day

Viewing the Schedule By Day will show shifts by time for a single day of business.
Schedule by Week

Schedule by Week shows shifts by the employee (sorted alphabetically by the last name) for an entire work week.
Footer
In the Scheduler 3 Footer there are the following buttons: View Sales Forecast, Options, Reset, Save and Send and Alerts. In this section we will review each button and it’s functionality.
![]()
View Sales Forecast
For details on setting your sales forecast, see Creating a Schedule. The View Sales Forecast button will allow you to view/edit forecasted sales.
Weekly Comments

“Click to insert a week comment” will allow you to add notes to printed schedule, such as notice of special events or staff meetings.
Options

- Copy From – Once you’ve created your first few schedules, you can lighten your workload by copying a previous schedule. No need to build a brand new schedule from scratch each week!
- View History – The QSROnline Scheduler 3 allows you to view each saved version of the schedule, and each version is dated and time stamped by user. This is a great tool for accountability. See who made what changes in the Schedule.See the Schedule History Guide.
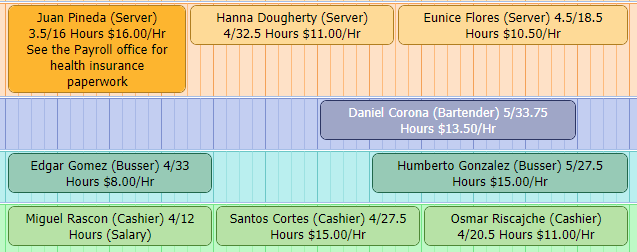
- View Pay rates – The pay rate for each employee will be displayed with their shift. For more information about how QSROnline captures pay rates, please contact our Help Desk by calling (877) 334-6640 or emailing sonicsupport@qsronline.com. (See the screenshot below.)
- View Total Hours – Each shift will list the employee’s total scheduled hours for the work week. They will appear after the employee’s name in the following format: Total hours for the shift/Total hours for the week. (See the screenshot below.)
- View Shift Comments – Comments added to an employee shift will be visible while in the day or weekly view. (See the screenshot below.)
- Edit Job Settings – Under Edit Option, Edit Job Settings will an administrator to adjust the following: edit the order in which jobs appear, add a classification per job (Manager, BOH, FOH…), edit the colors associated with each job, and select which jobs should appear in the scheduler.
Note: Classifications are used to group jobs together. For example, all jobs located in the kitchen may be grouped as BOH or Back Of House. In the Header click the drop-down next to the Ungroup/Group by Job button. Select Job Code to choose to sort by Job Classification. You can view the schedule, print options, and the Labor Analysis report with this view.
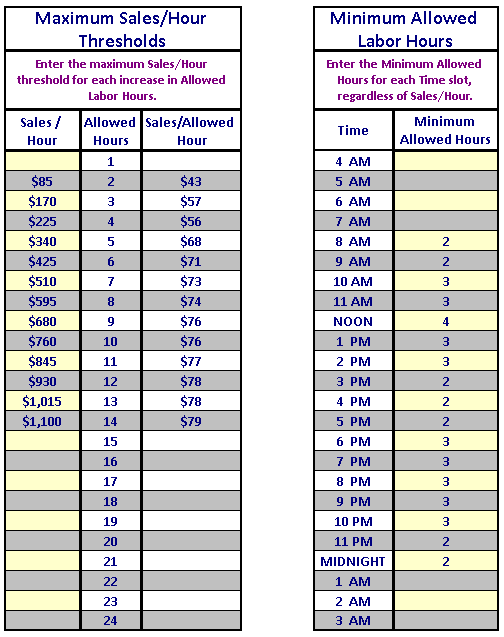
- Edit Allowed Hours – Allowed Hours provides a theoretical labor guideline. This tool provides a suggested number of employees who should be scheduled per hour based on forecasted sales and can be customized by location or for all locations. Detailed information about Allowed Hours can be reviewed in the Scheduler Allowed Hours Setup guide.
- Edit Schedule Defaults – Edit the defaults used in the Scheduler Alerts. The alerts will notify you of a saved schedule with employees who have shifts that are more than the weekly and/or daily limit. Alert options also include notification of shifts being scheduled over the minimum hours break between shifts, overlapping shifts, and availability conflicts.

- Edit Employee Availability – QSROnline does not currently collect “employee availability” settings from your POS system. Employee availability times must be set in QSROnline to avoid scheduling conflicts. By default, ALL employees will be labeled as “available” to work at ALL times in QSROnline’s system. Go to Options, Edit Employee Availability.
The Employee Availability window will open in a separate browser window. Using the drop-down picker, select the employee that you need to set availability for. This process will need to be completed for each employee.
For each day of the week, right click to begin customizing the selected employee’s availability. You can set the employee to be Available All Day (default), Unavailable All Day, Available For selected Day Part, or Unavailable For selected Day Part.
Times marked as Unavailable are labeled in red.
Times marked as Available are labeled in green.
You can also drag and drop the available or unavailable times for employees. Simply click on the green or red bar and drag it OR hover your mouse over the end of a bar to shorten or lengthen the availability.
Once you’ve finished setting the employee’s availability, click the Save button.
Because Edit Employee Availability opens in a separate browser window, you MUST refresh the browser window hosting the Scheduler after closing the Edit Employee Availability window. This ensures that new employee availability settings refresh during your session.
- Edit Delivery Settings – Schedules can be emailed, texted, and sent to employees via the Scheduling App as a push notification. For more details review the Sending Schedules to Employees guide.
- Print Today and Print Week – You can choose to print the daily or full weekly schedule. For more details review the Printing Schedules guide.
Reset
In the event you need to revert changes made to a saved schedule, you can reset the schedule to the most recent saved version. See Schedule History
Save and Send
Schedules can be emailed, texted, and sent to employees via the Scheduling App as a push notification. For more details review the Sending Schedules to Employees guide.
Alerts
It’s important to check for any possible scheduling errors prior to sending the schedule to employees. QSROnline smart checks your schedule to proactively alert you to any employee availability conflicts, overlapping shifts, unassigned shifts, or employees who will reach overtime. For more details review the Alerts guide.